<some deep and thoughtful title here>
Installing Firebird 3 on Xubuntu
05 April 2024
A recent question on firebird-support about using Firebird on Xubuntu, and the problems the asker ran into, lead me to trying it out myself. This post is basically a collection of the steps I took to get Firebird up and running on Xubuntu.
I’m usually a Windows user, and although I have collected some Linux knowledge over the years, I’m far from an expert. In other words, this might not be the optimal to do things.
Preparing the VM
To start, I’m installing Xubuntu as a Hyper-V virtual machine, as it’s included in my Windows 11 Pro installation. If you don’t have Hyper-V, you might be able to use something like Virtual Box.
I downloaded the Xubuntu 23.10 (Mantic Minotaur) desktop ISO image through https://xubuntu.org/download/#non-lts.
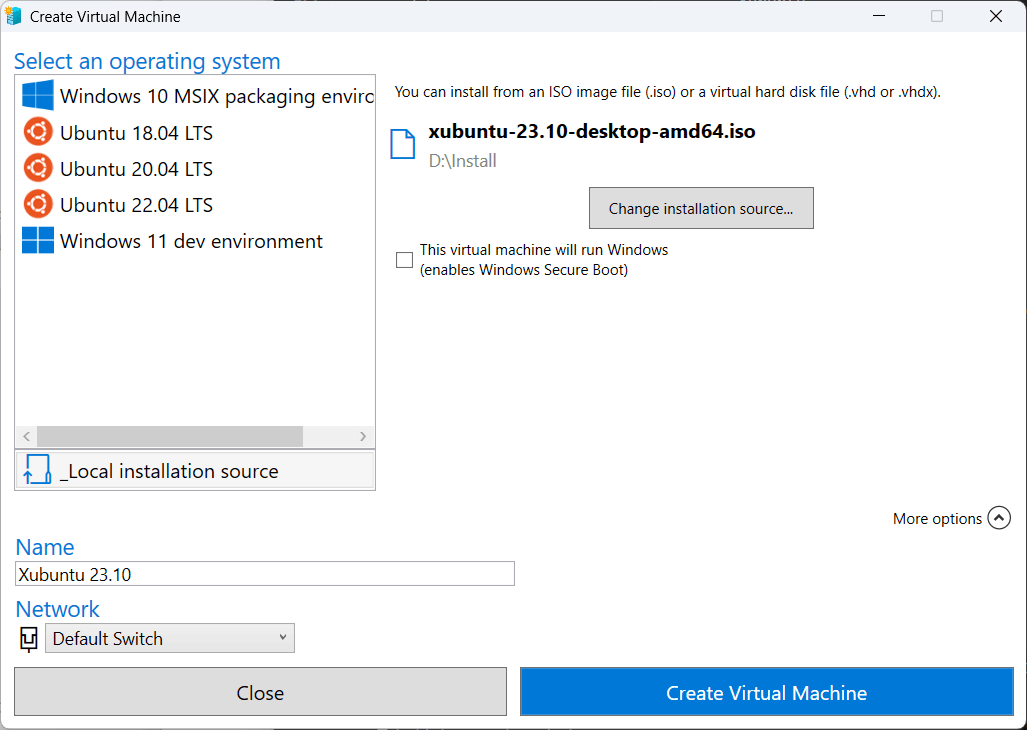
In the Hyper-V Manager, I created a new VM using the "Quick Create" option:
-
Select the “Local installation source” option and browse to and select the ISO image.
-
Uncheck the “This machine will run Windows (enables Windows Secure Boot)” option
-
Optionally, click on “More options” and set the name and network for the VM (I used the name “Xubuntu 23.10”)
-
Click “Create Virtual Machine” to start the VM and start the installation process
-
Wait for Hyper-V to initialize the VM, and then click on “Connect”
-
Hyper-V displays a message that the virtual machine is turned off, click on “start”
-
A Grub (Linux boot loader) window is shown, select the “Try or install Xubuntu” option, or wait for it to start automatically
Installing Xubuntu
Now, the Xubuntu installer allows you to select your language, and either “Try Xubuntu” or “Install Xubuntu”.
-
Select “Install Xubuntu”
-
Choose your keyboard layout, and click “Continue”
-
On the “Updates and other software” screen, leave the defaults as is, and click “Continue”
-
On the “Installation type” screens, choose the appropriate option for your installation. Given we’re installing a VM, which has its own virtual harddrive, the standard option “Erase disk and install Xubuntu” is good, and click “Install now”
-
On the “Write the changes to disks” confirm the change by clicking “Continue”
-
On the “Where are you?” screen select your location (this is for the timezone configuration), and click “Continue”
-
On the “Who are you?” screen enter the requested information, and click “Continue”
The installation will now install Xubuntu in the VM. This can take a while depending on your machine and internet speed.
After a while, the “Installation Complete” popup will show
-
Click “Restart Now”, and wait for Xubuntu to start up.
-
When the VM has restarted, enter the password you set previously to login
Installing Firebird
Now we’re ready to install Firebird.
As I said before, I’m normally a Windows user, so maybe some steps taken are not the optimal way to do things.
We’re going to install Firebird from the terminal.
-
To start a terminal, press Alt+F2 which will popup the “Application Finder”
-
Type “term” and select the “xfce4-terminal”, and click “Launch”
Although the latest Firebird version is Firebird 5.0.0, Xubuntu comes with Firebird 3.0.11, through the Ubuntu and ultimately the Debian projects. It is also possible to install Firebird using the installer from the Firebird site, but for this blog, I’m using the package provided by Xubuntu.
|
Although the terminal is textual, I will show screenshots of terminal output. That is because I’m writing this blog on Windows, and — at least by default — you can’t share the clipboard between the Hyper-V VM and the host, and I’m too lazy to find out if this can be changed or to use an alternative like exchanging files between the VM and the host. In some cases I do provide textual output, but there I have transcribed the output (possibly with typos), or — for isql output — retried it on Windows and copied and modified the output to match the output in the VM. |
First, I’m going to show how you can find what — if any — Firebird packages are available. This might help you if you’re using a future Xubuntu version, which for example might provide Firebird 4.0 or Firebird 5.0 instead of Firebird 3.0
-
To find packages, you can use
apt search. To look for packages with “firebird” in their name or description, enterapt search firebird: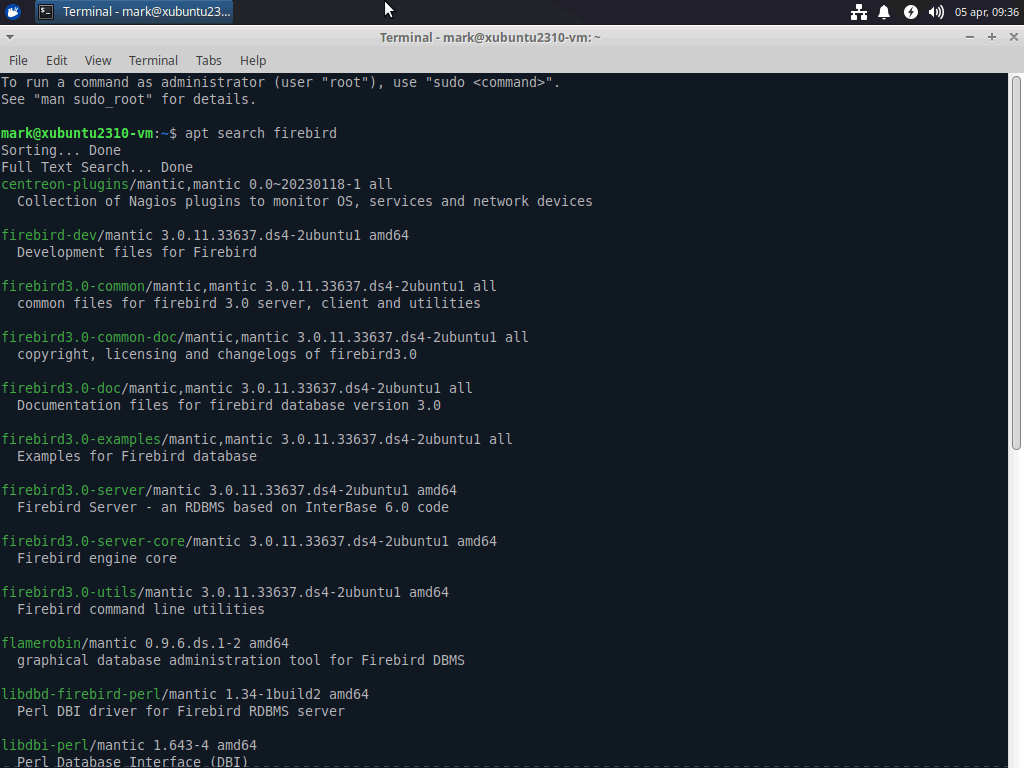
It lists multiple packages, but the ones we’re interested in are the packages starting with “firebird3.0”, and primarily the “firebird3.0-server” package. Some of the other packages, like for example “flamerobin”[1] might also be of interest to you.
-
To install a package, you use
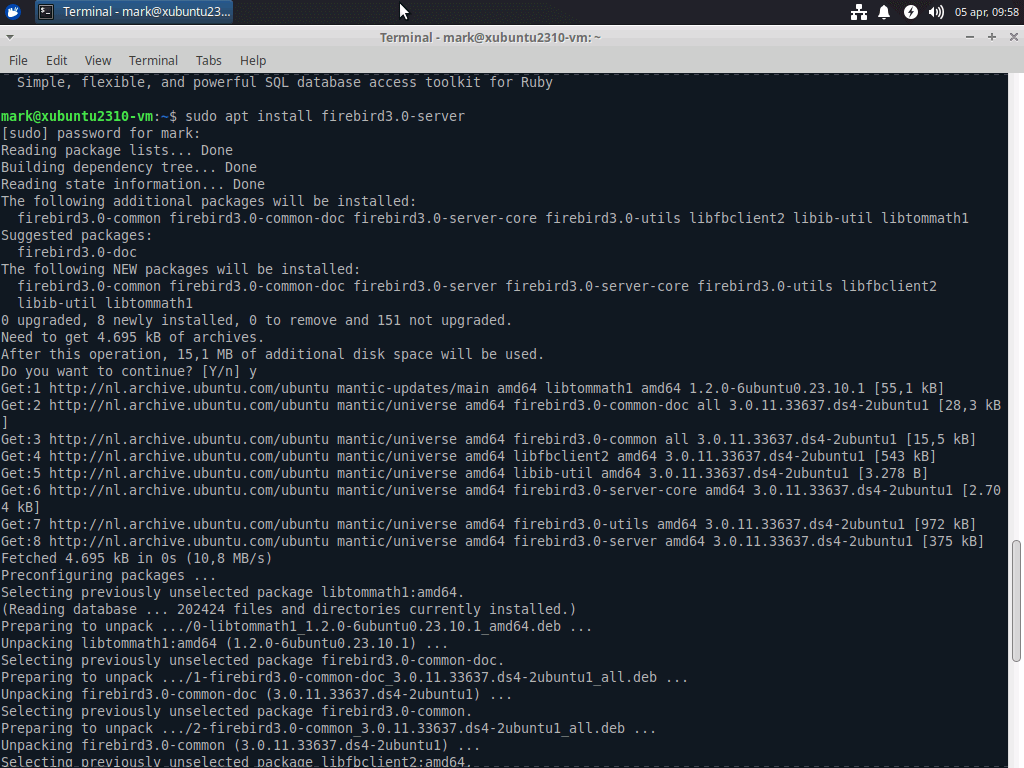
apt install, but installation requires super user privileges (comparable to Windows Administrator privilege/UAC), so you need to run it withsudo(which means as much as “do as super user”).Run
sudo apt install firebird3.0-server, and when prompted enter your password (the user created by the installer is allowed to elevate its privileges to a super user). -
aptwill show which packages it will install in addition tofirebird3.0-server. Confirm with Enter or enter Y followed by Enter -
The installer will prompt for a password for the SYSDBA user (the main administrator account for Firebird).
For purposes of this blog, I’m using the well-known password “masterkey”, but for a real installation, please use a strong password.
You can also let the installer generate a random password for you by leaving the password empty. You can find this password in the
/etc/firebird/3.0/SYSDBA.passwordfile. For a secure installation, don’t forget to delete this file later.Enter a password followed by Enter.
-
Wait for the install to complete
Using Firebird Server
The Xubuntu “firebird3.0-server” package also installs the “firebird3.0-utils” package, which includes isql-fb, a commandline query tool for Firebird. In a “default” Firebird installation, this tool is actually called isql (short for Interactive SQL), but because other database systems and for example UnixODBC also use a tool called isql, this Debian/Ubuntu/Xubuntu package renamed it to isql-fb.
For more information on isql/isql-fb, you can read the Firebird’s isql Interactive SQL Utility manual.
After installation, the Firebird server will have been started automatically, and is ready for immediate use.
-
A simple example of creating a database through the localhost Firebird server:
mark@xubuntu2310-vm:~$ isql-fb -user sysdba -f stdin
Enter password:
Use CONNECT or CREATE DATABASE to specify a database
SQL> create database 'localhost:/var/lib/firebird/3.0/data/testdatabase.fdb' default character set UTF8;
SQL>
Using Firebird Embedded
Firebird also comes with an embedded mode, which allows you to access databases without going through Firebird server. However, using Firebird Embedded does require some care, because by default it will share things like lock files and temporary directories with the normal Firebird installation (and this is recommended!).
Given the privileges required to access those directories, for normal Firebird Embedded usage, this means that you need to add yourself to the firebird group.
-
Run
sudo usermod -a -G firebird <your-username> -
Next run
newgrp firebirdto make the additional group privileges available to your user accountThe command
newgrp firebirdonly has effect in your current terminal. As long as you don’t log out and log back in, you will need to runnewgrp firebirdin each new terminal you open!If you expect to start a lot of different terminals, you may want to log out and log back in before continuing, as it removes the need for using
newgrp. -
Example connecting using Firebird Embedded to the database created previously:
mark@xubuntu2310-vm:~$ isql-fb -user sysdba /var/lib/firebird/3.0/data/testdatabase.fdb
Database: /var/lib/firebird3.0/data/testdatabase.fdb, User: SYSDBA
SQL>
The difference with connecting through the server is that we don’t specify a hostname, and we only need to specify a username, and no password. The fact that you have filesystem access to the database is considered sufficient authorization to access the database. The username is used to determine which privileges and roles you have available within the database.
Creating a database in your home directory
When using Firebird Embedded, you can also create databases in your home directory.
These databases will only be accessible by your user account (unless you compromise security by giving the firebird user and/or group access to your home directory, which you should not do).
mark@xubuntu2310-vm:~$ isql-fb
Use CONNECT or CREATE DATABASE to specify a database
SQL> create database '/home/mark/personal-database.fdb';
SQL>
You do need to specify the absolute path (or you can use ~ to resolve your home directory).
If you don’t specify a username when starting isql-fb or in the CREATE DATABASE statement, it will use your Linux username as the database username:
SQL> select current_user from RDB$DATABASE;

USER
===============================
MARK

SQL>
The End
This concludes the quick tutorial on installing Firebird on Xubuntu. If you want to know more about Firebird, consult the documentation on the Firebird website.
For questions, you can reach out to the community on firebird-support.
1. FlameRobin is a GUI query tool for Firebird
Jaybird 5.0.4 released
10 March 2024
We are happy to announce the release of Jaybird 5.0.4.
The following has been fixed since Jaybird 5.0.3:
-
Firebird 5.0 is now formally supported
-
Fixed: Potential NPE when
warningMessageCallbackisnullwhile reading operations or consuming packets (#778) -
Fixed: FBRowUpdater incorrectly considers result set with only partial PK updatable — backported from Jaybird 6 (#780)
-
Fixed: Use of offset timezone names (e.g.
+05:00) forsessionTimeZonewould result in a warning being logged, and an incorrect conversion applied (in UTC instead of the offset) when using the legacy time types — backported from Jaybird 6 (#787)
Jaybird 5 supports Firebird 2.5 and higher, on Java 8, 11, 17 and 21 (support for Java 11 and higher using the Java 11 version of the driver).
See also:
Jaybird 5.0.3 and 4.0.10 released
24 November 2023
We are happy to announce the release of Jaybird 5.0.3 and Jaybird 4.0.10.
With this release, Jaybird 4 is end-of-life. We recommend upgrading to Jaybird 5.
Jaybird 5.0.3
The following has been changed or fixed since Jaybird 5.0.2:
-
Improvement: Do not reject attempts to read blob id 0 — backported from Jaybird 6 (#765)
Previously, Jaybird rejected attempts to read blobs with blob id
0(not on all code paths, for some only when assertions are enabled). Formally, blob id0is not a valid blob id, but in practice they can occur (e.g. due to bugs, or access components/drivers explicitly setting a blob column to id0). Other drivers and tools simply send the requests for blob id0to the server, which then treats it as an empty blob. For consistency, we decided to let Jaybird handle it the same. -
Fixed: on
CHARfields, a too short value could be returned if the string contained one or more codepoints represented by surrogate pairs and the string length incharexceeded the maximum string length — backported from Jaybird 6 (#770)We now truncate the returned string if the codepoint count exceeds the maximum string length.
-
Fixed:
CallableStatement.getXXX(String)could return value from wrong column — backported from Jaybird 6 (#772) -
Updated: error messages updated from Firebird 5.0.0.1272
Jaybird 5 supports Firebird 2.5 and higher, on Java 8, 11, 17, and 21 (support for Java 11 and higher using the Java 11 version of the driver).
See also:
Jaybird 4.0.10
Jaybird 4.0.10 is the last release of Jaybird 4, and Jaybird 4 is now end-of-life. We recommend upgrading to Jaybird 5.
The following has been changed or fixed since Jaybird 4.0.9
Jaybird 4 supports Firebird 2.5 and higher, on Java 7, 8, 11, 17, and 21 (support for Java 11 and higher using the Java 11 version of the driver).
See also:
Firebird External Table Generator (ext-table-gen) 2.0 released
04 November 2023
I am happy to announce the release of version 2.0 of “Firebird External Table Generator” (ext-table-gen for short). (It was released back in September, but I forgot to put up a post on my own website.)
“Firebird External Table Generator” is a commandline tool to transform CSV files to Firebird external table files (a binary format for external table data).
Compared to version 1.0, a lot of new features have been added:
-
Support for additional data types:
-
Integral number types:
-
smallint
-
integer
-
bigint
-
int128
-
-
Exact numeric types (fixed point):
-
numeric
-
decimal
-
-
Datetime types:
-
date
-
time (without time zone)
-
timestamp (without time zone)
-
-
-
Customizing the CSV parser configuration (custom separators, quotes, escapes, etc.)
You can find the 2.0 release at ext-table-gen v2.0.
Documentation and release notes can be found on https://mrotteveel.github.io/ext-table-gen/.
The project itself is hosted on https://github.com/mrotteveel/ext-table-gen.
Firebird External Table Generator (ext-table-gen) 1.0 released
28 June 2023
I am happy to announce the release of “Firebird External Table Generator” (ext-table-gen for short).
“Firebird External Table Generator” is a commandline tool to transform RFC 4180 CSV files to Firebird external table files (a binary format for external table data).
External tables are a good way for bulk-loading data into Firebird. Unfortunately, external tables use a fixed-width binary format, and not (more) standard formats like CSV. It is not always easy to create an appropriate external table file, and this is where ext-table-gen can be used.
At a high level, ext-table-gen provides the following features:
-
Derive a
CHAR-based external table definition (i.e. aCREATE TABLEstatement and a configuration for ext-table-gen) from a CSV file -
Transform a CSV file to an external table file (either based on the CSV file itself, or based on a configuration file)
The current version only supports CHAR columns, which makes the generated file essentially a fixed-width text format.
Future versions may introduce support for additional column types.
You can find the 1.0 release at ext-table-gen v1.0.
Documentation and release notes can be found on https://mrotteveel.github.io/ext-table-gen/.
The project itself is hosted on https://github.com/mrotteveel/ext-table-gen.
Older posts are available in the archive.